Followers

Wednesday 30 July 2014

12 tags of July - Tim Holtz challenge

I am really enjoying the 12 tags series from a Tim Holtz, I am learning so much more :-)
If you fancy joining in too this is the link http://timholtz.com/12-tags-of-2014-july/

                                                              Here is my tag for July


Full step by step instructions are on Tim's blog , I altered it only a 
Little this time as I had got the cute die already 
& if you order from the suggested sites you get a discount 
Exchange rate really good from £'s to $


Christmas card with a difference

I made this card for my demo at the art of craft this Saturday 2nd August.
But I would also like to enter it into Hels Sheridan"s Sunday stamper challenge
If you would like to join in with Hels challenge you will find it :-  Here
This week it's - A Winters tale


This card has a removable reindeer to hang on the tree, it's held on with a red brad, but you can turn circle around so it's not naked when reindeer removed. Obviously you will have to put in a note or tell your friends how to do it :-)

This is the wooden  reindeer below


I painted it in cream acrylic paint. When dried I sprayed some butterscotch ink onto my glass mat and sort of dunked the reindeer in it randomly. Do this both sides.


 The card is 7x5 white , I used some gold mirror card for the first mat, but cut out a circle first as it won't be seen & I hate to waste gold card !!


So then I used a permanent marker to colour some jingle bells red, I also coloured a gold brad red too


I used a letter to Santa paper pack & chose a nice night sky blue stary one
To mat onto the gold card.


No idea why it looks red in photo above !

This is the A4 decoupage kit I used to pick out a circle Santa topper
To go on the reverse of my gold circle

See below, this is the reverse of the gold circle.

 
These are the stamps I used for the greeting
& some stars used too. On a white circle I stamped & embossed
This stamp & also stamped & embossed some stars around the card 
in white ink & clear powder


 So when the red brad is removed & the gold circle is turned around, fixed
Back with the brad, this is how it looks below photo.


Tuesday 29 July 2014

Feeling fruity , crafting cafe challenge

I am very excited about becoming a Member of the DT for the Crafting cafe monthly challenge.
What fun !

July is all about feeling fruity ! And is sponsored by Lacy Sunshine
They have some gorgeous digi stamps and are the July sponsors too.

This is my card & I am giving it my bestest mate for her Birthday next week.


No prizes for noticing my cherries pattern is sideways - lol  


It's cherry background from Happy Days range , DoCrafts , as is the big bloomer & die cut shape under it. 
So , it starts with an 8x8 card & fold the front down to make the easel as shown below.
 I used a Martha Stewart punch for interest & backed it with a soft green
& inked the edges with lettuce ink pad


I love this stamp , used the girl , flowers & the small butterfly


Below photo is the pack of happy days die cuts 


 And above it the die I used to cut out the soft green doily to go under the stamped girl.
 A made a punched & inked strip to go across the card with the die cut above it & bloomers to act as a stop for the easel. All inked in either red brick or lettuce

Tim Holtz CC3 challenge no.7 painted industrial

This clock is something I have been meaning to paint and embellish for ages.

Thought it ideal for the latest Tim Holtz CC3 challenge - to join in , click Here
It's lots of fun and there are great sponsors. & badges for you blogs.
Inspiration Emporium shop are giving away $50 dollars to spend to one lucky winner every odd numbered challenge & this is no 7 !

As always, they will select a “Curiosity Crew’s Choice” winner who will receive a spectacular assortment of Tim’s products, courtesy of Tim himself and Mario Rossi, his business manager .
So get going to enter - you just need your own copy of a Tim Holtz Creativity Challenge 111 book
You can get your own signed copy Here

I cannot share the actual process described by Tim in his book, it wouldn't be fair after all his work on the book, you do need your own copy & I promise you won't regret it.
But I can show you some of the process below.


This the bare clock, I painted it over in cream acrylic paint first.


Above photo is the shape cut out In metal and decorated as per Tim's tutorial in the book.
 Below photo is me layering up pieces to go on, lots of changes, finished clock is a little different, but this just shows the process. Then painted over in places with cream acrylic. Spritzed with various
Inks , dabbed with paints . Silver rub on , adhesive stones, metal embellishments & buttons
All added to the mix ! And a few time related chit chats added.


The flowers & cogs  are cut with Tim's  dies
Flowers are cut from metal too.


Thursday 24 July 2014

Dies and inks - dreams on Canvas

This is influenced by Tim Hotlz as he recently showed in CC3 book how to use burlap panels with
Ink and tissue paper. So I wondered if it would work with some bare basics canvas.
I would like to enter this into 'A Vintage Journey Challenge ' to be found here :-

http://www.vintagejourney.com/2014/07/challenge-10-dies-and-distress.html
Or click on the Link on the side bar.

And Hels Sheridan's Sunday Stampers - In Dreams , to be found here :-)
Or click on the Link on the side bar.
http://pinkleart.blogspot.co.uk/2014/07/sunday-stamper-week-317-in-dreams.html


And Top Tip Tuesday - Material Girl , Top tip is to use Gloss medium to add tissue & ephemera to canvas.
To join in  the fun , click on TTT on the side bar.
http://toptiptuesday.blogspot.co.uk/2014/07/material-girl.html


Below are the goodies I used to create this & lots of lovely paints & inks


Below is the canvas covered art board.
I plastered on the studio gloss medium & added the Madame Payroud tissue.
More medium painted on top. When dry I used the two inks shown to smudge in a little colour over the tissue paper also adding the stamped saying on the right with more medium.


See the 'Saying in close up below'  with a 'Vinyls' butterfly
& some chit chat stickers 'time & 'to


I couldn't find my little metal clock parts so I dig out a much loved die die (see below) to cut out a couple of clock hands. Not sure you can still get this die , but if you see it, it's very useful for clocks & steampunk.


The final photo below was take in the garden on my table, looks nice on there don't you think ?


Friday 18 July 2014

Compendium of curiosities challenge - 6

Tim Holtz CC3 challenge , no 6  Secret Garden


I am so loving this challenge , I am glad we have lots of projects 
In the book to go still :-)
As usual I am not allowed to mention the exact challenge, you need to
And get a copy of Tim's book it's great , you won't regret it 

There are fabulous sponsors and prizes
www.thefunkyjunkie.com
& inspirationemporium.com

This is my entry, it's an altered burlap panel .

I got the idea and it wouldn't go away ! It was brilliant to do & made me use a technique 
I have not used for a while . 
Ten seconds studio metal for the die cut door pediment, the bird & the keyhole.
I embossed with my metal embossing tools & used distress inks to stain them
Along with the other metal embellishments , the watering can, the key & door knocker.


The Tin Hotlz burlap panel is really great for projects like this one
Below photo is the panel after following Tim' technique 


Paints used on burlap were Fresco Cinnamon , ice blue & a little bit of beach
Hut & French roast.


Thursday 17 July 2014

A mini book - Hels Sunday stamper

Sunday stamper - 316 - Everyday I write the book challenge.

Do join in to this fun weekly challenge, all about stamping funny enough ! The link is on the side bar.

This week I have a mimi book to show, it's a DoCrafts mini album A6 - ish :-)

 
This is the front page, I inked a text stamp with chocolate brown artiste ink and stamped it around the front of the album , also dragging the ink pad around the edges .
Using the Vintage notes range, I used a beige paper, embossed with cogs folder & softly inked raised embossed cogs in the same ink. 
Before sticking down the floral Lacy paper (stamped randomly with text & inked as above )
 , stick 3 loops of ribbon under it as shown below.


 Using a rose card stock sticker , (also inked )I decoupaged a larger rose over the top & added this above the lacy piece.


I decorated further with labels , a heart , adhesive stones & a ribbon through the holes at the top.

The balloon is die cut in deep wine colour. The die is from the build a scene set. Balloons.
There is some bakers twine from the balloon to the labels.


 A made a second page inking and stamping the base as before , I used the front of a pre embossed
Card blank, highlighting with artiste ink. The butterflies were stamped onto the I embossed oval centre & coloured in with watercolour pens, the large butterfly was stamped again on the spare card blank back , cut out & decoupaged on.
Further stickers , tags , stones , ribbon & twine were added.


 I did a third page ( this was for a class ) but there are 6 pages on the album in all.
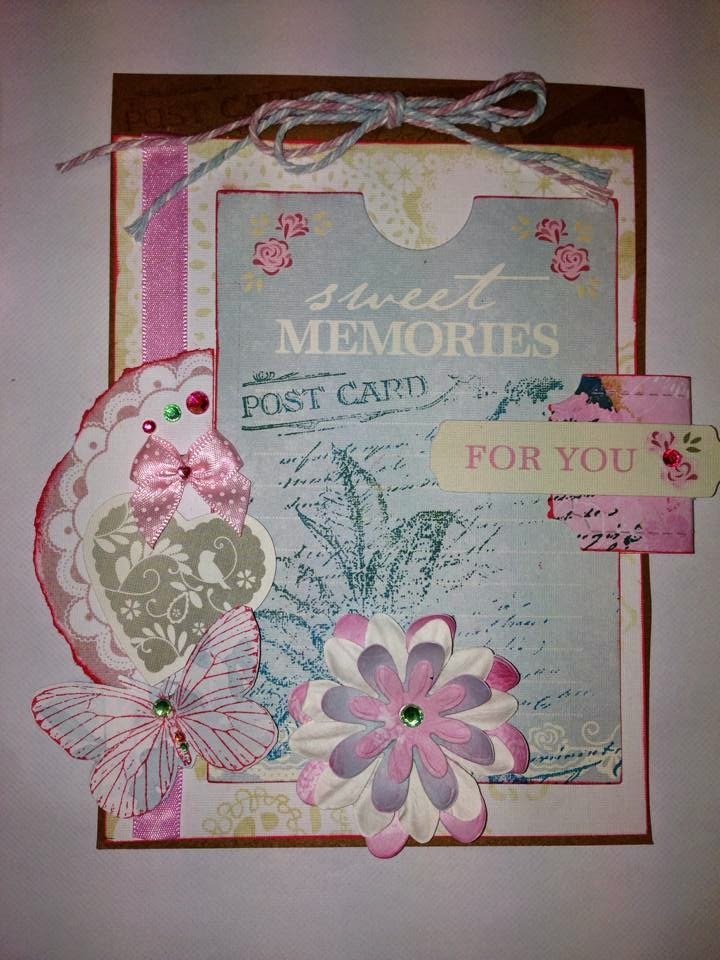
Inking the page base as before , adding a beige lacy paper from vintage notes .
This was inked in and a ribbon stuck down the left side.
I tore a doily piece from vintage notes paper , inked it in deep wine & stuck it over the
pink ribbon which I then placed the sweet memories sticker over. This sticker
Was stamped in teal, with a background stamp (text, leaves, post card )
Added flowers inked up. Stamped , cut out and added a butterfly.
More twine, ribbon, stones & a heart sticker were added.


Monday 14 July 2014

Orchid rock rose painting

Today it was cloudy and as we go home from holiday tomorrow , we had a chill out day.
Adrian was making up his little race cars and I found a pretty flower outside to paint.
According to a flower app it's an Orchid rock rose.


Re visiting a lovely play with resist technique

This card was done a while ago but I wanted to enter it into the Craft Stamper Blog challenge
Resist embossing technique with the wonderful 'WOW' embossing powders as
The sponsors 


I used the lovely stamp below by Wendy Vecchi
for the decoupaged flower &
The dogstooth pattern for my resist technique 


See below where I have inked up just what I need on the stamp
The dogs tooth pattern on left.


I used a soft green pigment ink on the stamp  with clear embossing powder.  
Then the ink used for resist is a tim holtz as shown below


Friday 11 July 2014

Florence's 4th Birthday card

My granddaughter Florence is obsessed with all things princess and fairy themed !
So I found this cute digi & coloured her in with pro- markers
The die is a tonic one cut out in silver Miri board.
My top tip is to look in your waste pieces for checks and flower background as they mix well
In Strips as shown

Sunday 6 July 2014

Sunday in Portsmouth

I met some great crafters today , people were interested in everything I was showing.
I Showed some new ideas and shared techniques.

With so much chatting and digressing I only got a few new easy cards done , shown below .

The bauble & seasons greetings stamps below are cover mount gifts on the July creativity magazine.
As was the glitter glue used for a bit of bling on the baubles. The background red paper is ' A letter to Santa' set.  The card is a cream 4x4 ideal for a quick Christmas card.

 This next card was really fast , I just cut out a section of roses paper from the Boltanicals papers
Cutting out 2 extra & a butterfly, then decoupaging them as shown with a sentiment & bow
All was inked with a pink chalk ink pad around edges to define


 Below photo is (Another !) easel card , this time 8x8 & using the brand new capsule range .
Wild rose with midnight blush big bloomers , bow & die cut shapes.


This next one was a bit of an experiment and maybe a little different 
I stuck down some tissue onto a piece of hessian, colored in the reindeer with gold glitter.
The little bear I cut out and placed in the frame has glossy accents on it, as does the present & drum.
It's another little 4x4 card.